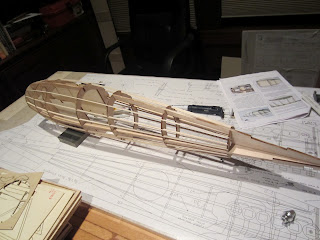
Made some progress on the fuselage this week. So far I've added the stringers, installed a tray for both the ESC and the battery, installed mounting brackets for servos, and filled in the tail section with spider foam. Also got the vertical and horizontal stabilizers framed out. Some pics below:
Fuselage after the stringers were added
Another view of the fuse with stringers
The 4 tail section quadrants are filled with foam and then carved/sanded to shape. I had some extra spider foam from some carbon fiber glider projects left over so used that. I hot-wire cut the basic shapes out, and then used a razor and sand paper to get the final shape
Here I've added a tray near the top of the fuse to mount the ESC. It mounts upside down (so will be accessible from a hatch in the bottom. I'm using a Castle Creations Ice 75 ESC.
Here's a view of the battery tray. This is looking from below the fuse through the opening where the removable hatch will be. The black stuff on the tray is a soft rubber (tool drawer liner) that helps keep the battery from sliding around. The ESC lies below this tray.
Another view of the ESC and battery trays
Here's the horizontal stabilizer and elevator being framed up on the building board. This plane has a huge horizontal stabilizer...it's as if they didn't understand the benefits of higher aspect ratio wings back then.
A view of the stabilizer and fuselage next to each other
I taped the tail surfaces to the fuselage temporarily just to get an idea of what it looks like together. First time it's actually starting to look like a plane!
The instructions have started getting a little ambiguous a this point in the build...there are some general guidelines, but not much in the way of details, so I'll have to take some liberties for the next few steps. I plan to install the control rods for the elevator/rudder next, as well as a power plug that allows me to effectively unplug the battery without flipping the plane upside down. Then I'll build the dummy motor (it's made out of balsa and doubles as another hatch and access to the real motor up front. After that I'll work on the landing gear and upper wing cabanes, and finally sheeting the fuselage.
I'm planning on using the color/paint scheme from Albatross D.II. 1729/16 flown by Hptm. Schmickaly (shown below). I like the natural wood fuselage of this plane and it didn't have the complicated lozenge patterns for the wings that are on many of them. There are several other neat color schemes out there, too, so I haven't completely decided yet.


No comments:
Post a Comment